Showing posts with label guest blog. Show all posts

Monday, December 19, 2011

Day 353-sister craft

Tonight's craft is bought to you by my little sister Rachael. She has recently taken up crafting, check out her farm animal finger puppets... 

first sketch your shapes onto paper as a pattern
cut these out of felt
start stitching..
Rachael has been using invisiable thread (sort of like really fine fishing line)
next glue on the eyes

awwww cute!!!!! farm family fingers
craft out
xxoo

Monday, September 12, 2011

Day 255-Guest blogger mondays!

Tonight's guest blogger is my lovely mum!
She recently decopaged a postage box for her sister and their family (as they were about to head off on the trip of a lifetime around europe). Mum had been collecting some little "travel safe" pressies and decided to get crafty and decorate the parcel!

she started with a postage box
  and some travel europe travel brochures
she also photo copied some photos of her sister and their family and then added these into the pictures
my uncle bob on a gondala
my couz fran at the eiffel tower
the whole fam running from the bulls in spain!
My aunty and the fam were in fits of laughter when they recieved the parcel in the post!

great job mum!
love bron
craft out
xxoo


Monday, September 5, 2011

Day 248-Guest Blogger! Caroline is back!

My most dedicated guest blogger Caroline is back! this time with a project for herself


The main idea behind it was to create a skirt from leftover material (used the green cord for a pair of pants for Tom) but make it something that could be a summer or winter skirt.

I used a pattern from a+ Skirts (www.makeitperfect.com.au). These skirt patterns are super easy and I finished this whole skirt in an afternoon.
Step 1 - Pick out your material offcuts!
I had the green cord material leftover so bought some bright summery floral to lighten it up a bit
After doing the maths, I cut the material into strips to give me the right number of strips and the correct overall width of material needed by the pattern. I then overlocked all of these pieces together to make one big piece of fabric
Step 2 - trace the pattern onto paper to save cutting out your pattern
Step 3 - I then cut out my pieces keeping in mind how I wanted the front of my skirt to look i.e. feature panel on the front of the skirt
Step 4 - Sewed the 4 pieces together (Doesn't get much easier than that!), right sides facing
Step 5 - I sewed in a velcro strip instead of a zip - soooo much easier when you don't have much time. It was a bit skuiff but will do the job til I have another chance to put in a zip instead. This was the first use of the sewing machine - up until here the overlocker had done the lot! Awesome!
Step 6 - sew up the hem and give it an iron and then parade around the lounge room in new skirt!
thanks Caz!!! I was hoping your picture would share your beautiful face too!
the final product looks great (noice boots too!)

craft out!
xxoo

(by the way my computer packed it in tonight, so using andee's, off to buy a new computer tomorrow! hopefully i dont loose any info off the old hard drive!)


Monday, August 29, 2011

Day 241- Guest Blogger for charity

Happy Monday everyone!

Today's guest blogger is Angela Mezzatesta, Angela is a co-worker of mine and she has just quit her job and is heading off to Uganda to help set up and run a sewing school. Angela spent 6 weeks in Uganda last year helping to build an orphanage as well as starting this sewing centre (see photo below). Since then Angela has stayed in touch with these woman and this time is heading back to set up and run a sewing school for one year.
I am truely inspired by her commitment to this project! she has quit her job indefinitely, rented out her house and is self funding much of the project with her own savings! I also love that instead of throwing money at a problem she is going to help teach life skills which will enable these woman to earn an income in the future.
She does however need some help, she needs to raise money to keep this project running. If you can spare even $10 this will go a long way to help (see below what you money will pay for and the link to the charity site).
Angela is going to email me updates from Uganda which I will put up on the blog here to keep you informed about her journey.

Help support The OrphFund Sewing School by donating today. OrphFund is running a one year programme, in Uganda, to teach six young women how to be proficient dressmakers in their local village, Kasese. These women have been impoverished since early childhood. Some are Internally Displaced, abandoned, orphaned and/or homeless. By providing these young women with a skill they are given the chance to become self sufficient by earning a living, which in turn, will remove them from the poverty cycle.

Your donation will make a real difference to their future. What your donation will do:
$10 = Sewing materials (for one student) per month.
$20 = A student's study allowance per month.
$30 = A teacher's wage per month.
$90 = A brand new sewing machine.

It only takes a few minutes to donate via my web page and is completely secure. Please feel free to also leave me a message when you donate, which will be posted on my message board!

To donate, simply click on this link and follow the instructions: http://www.onlinegiving.com.au/pages/httpwwwonlinegivingcomaupages.aspx

Please feel free to forward this email on to others so that OrphFund may benefit.

Thanks in for your support!

Regards,
Angela & the OrphFund Team

My Online Giving page is: The OrphFund Sewing School.
Please visit: http://www.onlinegiving.com.au/pages/httpwwwonlinegivingcomaupages.aspx


Monday, August 22, 2011

Day 233-Guest blogger-my sister

Tonight's guest blogger is my sister Rachael, you may have seen her photo earlier in the year when she got married. Rachael put her crafty pants on and made a little paper hat for our other sister (Megan's) hen's night
see pics below...

draw a circle onto some cardboard at the base of a rectangle to create the funnel for your top hat
 cut around the outside
 stick the funnel together
 add tape to the bottom for the brim
 cut out the brim
 top hat base is complete
 decorate
 glue on the comb and hold in place with pegs
 enjoy!
 the middle two are my sisters
would you like to share your creative project or website?
email me at broncobowerman@hotmail.com

craft out
xxoo

Monday, August 15, 2011

Day 226-Guest Blogger Monday "Ann Maree Gentile"

Its a rainy old winter's night here in Miss Melbourne, I am not feeling very well myself and ended up heading home from work early and going to bed (so I am feeling just a tiny bit sorry for myself...).

To brighten up the mood I am featuring some work by a ceramic artist I discovered earlier in the year
Ann-Maree Gentile

Ann Maree works from her studio/shop in a small town approx 1 hour north of Melbourne called Warrandyte
I discovered her studio when my fiancee and I were visiting our wedding venue location near here and we stopped off in Warrandyte for a coffee. Her works are mainly out of clay and recycled/found objects.
I have purchased one of her sculptures myself which sits proudly in our living room.
I highly recommend if you are looking for a nice weekend drive to visit her studio located at

AmUsing Clay Studio/Gallery
Rear, 230 Yarra Street
Warrandyte, VIC 3113
AUSTRALIA
(Behind the Roundabout Café)


although you may want to call to check she will be there first as she does not have set "opening hours"
(the joys of running your own shop!) I love the quote on her website "my studio/gallery is open whenever I'm there creating, which is often but not set hours so feel free to call before you pop past"

The cute little studio
 with a hippie little cafe next door
 I love that when ever I have visited
Ann Maree is always making something in the studio space

 her work is colourful and playful


I love the black and white pieces too


I hope this has brightened up your night too
Craft out
xxoo


Monday, August 1, 2011

Day 212-Guest blogger Mondays welcomes Aunty Jude!


This week's guest blogger is my beautiful Aunty Judy! Below is her DIY project...

Hi, my name is Judy and I am Bron's Aunty living on Mt Tamborine in 
the Gold Coast hinterland. We have lived in this house for 8 years 
and I have wanted to change the look of the kitchen for that whole 
time, so I decided to start with the windows which frame a fantastic 
view to the coast. The venetian blinds were never used so I really 
just wanted to "dress" the windows. I guess this is more a DIY home 
reno that craft but it was fun and pretty easy!
Before....


Firstly we measured the width of the window frames and headed out to 
purchase rods, fittings and to decide on the fabric.
My original idea was to just do a simple "swag" draped around the rod 
but as with some of Bron's craft projects sometimes turns out 
differently!
I decided I would need double the width of the window in material to 
get enough for the draping and found a soft cotton in a 140cm width.


I had wisely invited my Mum (Bron's Grandma) and her sewing machine 
down for the weekend, thinking two heads would be better than one!


My Grandma Norms gets crafty!


Once we returned home my other half kindly attached the rods to the window 
frames and G'ma and I got into the project.
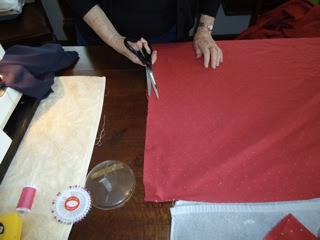
Basically we were making a tube of fabric to drape around the rod.
We cut the fabric according to the window widths and realised we 
could get 2 lots of 80cm width thereby giving us 4 times the width of 
the window frames.


sew each side of the tube of fabric, 
 leaving a decent size gap to pull thru
 the right way when finished


I then decided to taper the ends, so turned it back inside out and 
measured a 90 degree angle at each end,cut and sewed again and pulled 
back through.


This must have been where the original idea went out the window as no 
photo's were taken of the "swag" which just did not look right and I 
think the reason being that the rods were too narrow, that look 
really needs a solid wooden rod to look good.
Returning to the drawing board we unpicked a small opening at the 
top of each "taper" wide enough for the rod to fit through and tried that...


Hmm, not too bad but needed finishing touches, so we cut scraps of 
leftover material and sewed some ties


They did not have to be neat just functional and a little bit rustic
And Voila!


You can view our home on Homeforexchange.com (ID 39416), we are 
looking for an exchange in January 2012 to attend Bron's wedding in 
Melbourne.

Craft out folks
xxoo