Thursday, December 8, 2011

Day 342- bah hum BUG?

Another day, another card...

I started by printing "bah hum bug" from my computer and glueing it to some bright green card
 I found a fake bug and made him a christmas hat (attaching it with the glue gun)
 then attaching it to the card
 done!
 these are my type of christmas cards!!
happy craftmas!
xxoo

Wednesday, December 7, 2011

Day 341-Total "Ho Ho Ho!"

Tonight I am bringing my humour to christmas...

Starting with a print out of something I put together on the computer...
 then stitching on a little felt boot with the sewing machine
 insert candy cane
 voila! card and gift in one
happy craftmas!!
xxoo

Tuesday, December 6, 2011

Day 340-crafty greasey costume

Tonight I am putting together my costume for my "grease" themed work christmas party on friday...

I found a super ugly hot pink zip up sports jacket from the op shop for $4.
 Next I printed out the text "The pink ladies" onto paper
 Then I used the print out as a template and cut the text out of black felt.
I started hand stitching "The" and it took way too long so I ended up whipping out the hot glue gun and sticking it on
 costume ready, more pics to come on friday
25 DAYS TO GO...
craft out
xxoo

Monday, December 5, 2011

Day 339-retro christmas

Hello crafty folk,
tonight is a little chilly here in Melbourne brrrr, its supposed to be the 5th day of summer!
I have pulled out my box of old magazines, a big tub of PVA glue and put my "decopaging" skills to work!


I started with some plain brown cardboard stars (which you can buy at most craft shops)
 and started flicking thru this 1959 womans weekly
 I traced the star shape and got glueing 
 I love how she now looks a little cross eyed!
 next, marilyn, a star for the star
 and then I cut to shape some stripey paper to finish the edges

 cute hay!
craft out
xxoo

Sunday, December 4, 2011

Day 338-Christmas wrap and gift cards

My handprinted christmas wrap from yesterday is all dry and ready for wrapping
 I am also making some little handmade gift name tags from scraps of cardboard
simply cut out circles (glue the smaller ones to the centre of the bigger ones)
 hole punch at the top
 cut the letters of the name of the person out of magazines and thread some ribbon or wool thru the hole punches at the top (I found using 2 hole punches in each helps to hold the circles flat to the present, just showing the side with the letter on it)
 These gift tags would be fun and easy for kids to make too...
 for this one I actually used the dried piece of lace that I used as the template for the print, as well as a variety of pieces of string, raffia and lace
 I used one of the printed bells as a gift tag for this one
 COMPLETE!!! 
(such a shame i didn't actually have any presents ready to wrap and that these are actually empty boxes.....)

craft out
xxoo

Saturday, December 3, 2011

Day 337-Christmas wrap

Today we are preparing for a big family bbq at our house, so amid the meat marinating and salad making I have managed to sneak some craft creating in the mix.

I decided to have a crack at printing some of my own wrapping paper,
forget spending heaps of money on bought gift wrap! 
all you need is a roll of brown paper from the $2 shop, a few different colours of acrylic paint $6, a mini paint roller set $2 and away you go.... 
 I tested out a few techniques first on some scrap
 and then got to work creating my own design
 this one is ready to hang up to dry
next i tried using a piece of lace strip as the template
 I used the roller over the top
 and then lifted the strips to reveal the pattern
from this one roll of brown paper I will have more than enough wrapping paper for all the presents i need to wrap. This is definitely a craft that kids would love to get involved with. Don't worry if you drip some paint or your pattern is not symmetrical, the more rustic the better!

Tomorrow night I will wrap up a few pressies  and add some gift cards to show you how the paper turned out once it has dried...

craft out
xxoo


Friday, December 2, 2011

Day 336 continued, the photoshoot and "the bride" coat hanger

Check out a couple of pics from the photoshoot!!! yay!


and tonight's craft....

I started with a wooden coat hanger, some wire and some ribbon...
 I pulled the bottom wooden rung of the hanger,then placed the hanger on top of some plain paper and sketched "The Bride" in swirly writing
 next I started bending wire into the text shape (all in one piece)
 when i finished i started wrapping ribbon around it (glueing it in place along the way)
 the ribbon wrapping is taking forever!!! its 11am and i have got to go to bed....
craft out
xxoo

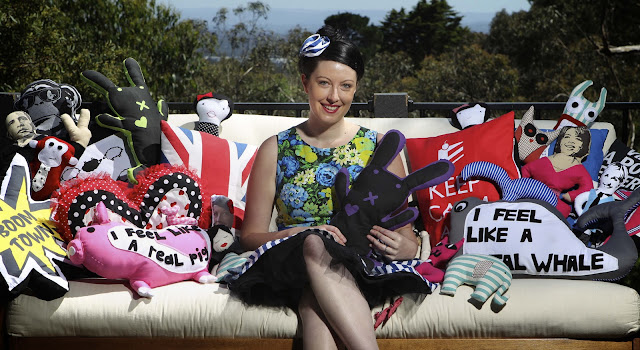
Day 336-Photoshoot fun!

This morning I got out of bed at 6.50am to get the house ready for "The Age" photographer to come and take some pics. Its now 10.50am, the house is ready, my make-up is on and the crafty creations and set up ready to go, just waiting for the photographer, FUN! ooooo its a knock at the door

wow, that was quick, the photographer has been and gone and its 11.04am, I better get out the door and off to work...

I managed to drag the table and chairs off the deck and pulled the couch outside for the shoot
 now to decorate... just enough room for me to squeeze in the middle
 the state of my craft room (gotta love doors and cupboards for the old "shove and shut" routine
 the house is all nice and neat (out here anyways)
 dining table/gallery display
 dining room/gallery display....
I will keep you posted as to when the article is out and about!
cheers
craft out
xxoo

Thursday, December 1, 2011

Day 335-Glass bottle upcycle

Simple, easy, cheap and fun!
that sounds like my kind of craft....

start with some glass jars or bottles from the op shop
 take some lace or textured fabric and stick it to the bottle with masking tape
 for this tall bottle I used lots of different strips of lace
 lightly spray the bottle with spray paint

 and the best part....
peel it off to reveal the final product
craft out
xxoo